Have you ever walked past a bakery and felt a little sad because you couldn’t eat the crusty, fresh bread inside? If you are living gluten-free, you know that finding a loaf of bread that actually tastes good is hard. Most store-bought options are small, frozen, or taste like dry cardboard. What if you could make a warm, golden loaf right in your own kitchen without any hard work?
Many people think baking bread is too difficult, especially when you take the gluten out. They worry about the dough being too sticky or the loaf falling flat in the oven. The good news is that you do not need to be an expert baker to make this recipe. You do not even need to get your hands messy with kneading. This recipe will show you how to get that perfect bakery-style crunch at home.
PrintThe Best Beginner Gluten-Free Bread – No Kneading Required
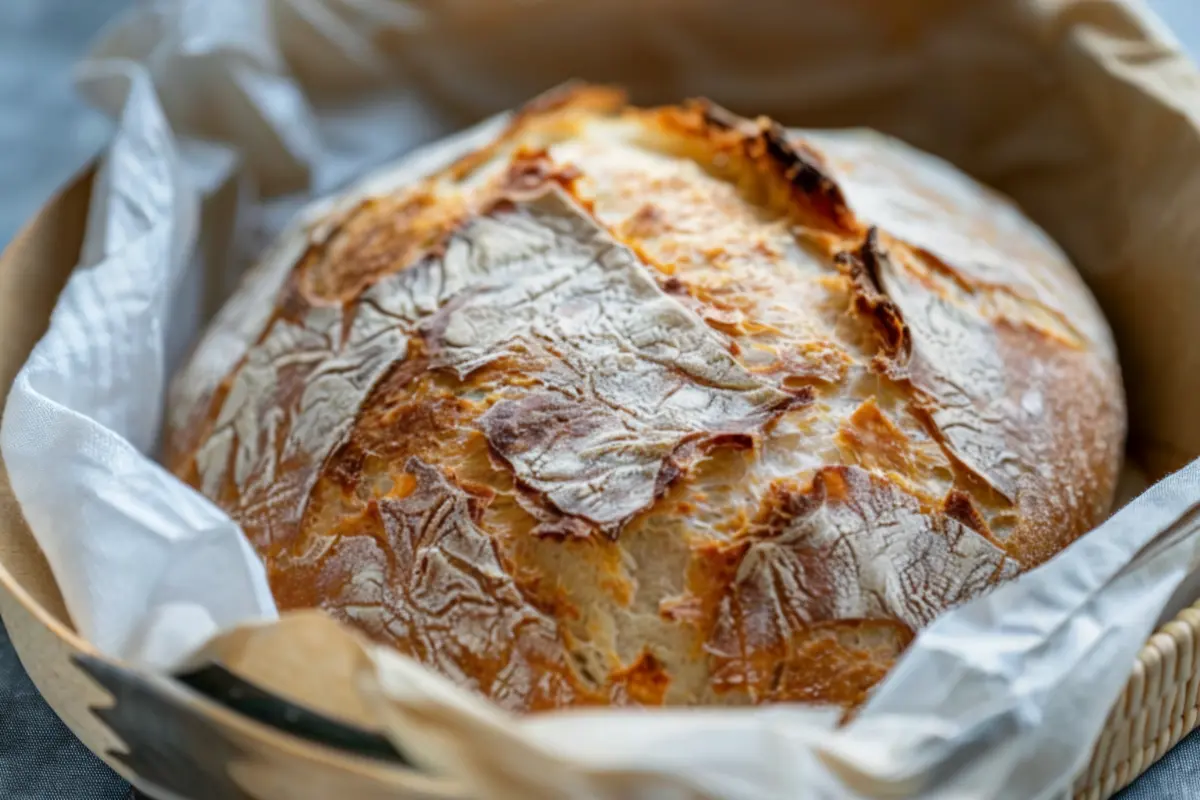
This recipe is a game-changer for the gluten-free world. It is special because it uses a ‘no-knead’ method, meaning you just mix the ingredients in a bowl and let time do the work. The result is a 100% gluten-free loaf with a crispy golden outside and a soft, airy inside—perfect for beginners!
- Prep Time: 10 minutes
- Cook Time: 45 minutes
- Total Time: 2 hours 55 minutes
- Yield: 1 loaf
- Category: Bread
- Method: No-Knead Bake
- Cuisine: Gluten-Free
Ingredients
- 3 cups Gluten-Free All-Purpose Flour Blend (with xanthan gum)
- 1 1/2 cups Warm Water (approx. 110°F)
- 2 1/4 teaspoons Active Dry Yeast (1 packet)
- 1 teaspoon Salt
- 1 tablespoon Sugar or Honey
- 1 tablespoon Olive Oil
Instructions
- Prepare the Yeast: Mix 1 1/2 cups warm water with 1 tablespoon sugar. Sprinkle 2 1/4 teaspoons yeast on top and let sit for 5-10 minutes until foamy.
- Mix Dry Ingredients: In a large glass bowl, whisk together 3 cups gluten-free flour and 1 teaspoon salt.
- Combine: Pour the yeast mixture and 1 tablespoon olive oil into the flour. Stir with a spoon until all flour is wet.
- First Rise: Cover and let rise in a warm spot for about 2 hours until bubbly.
- Preheat: Place your loaf pan in the oven and preheat to 425°F.
- Transfer: Line the hot pan with parchment paper. Scoop the dough into the pan and smooth the top with a wet spoon.
- Bake: Bake for 40-45 minutes until the top is deep golden brown.
- Cool: Let the bread cool completely on a wire rack before slicing to prevent a gummy texture.
Notes
Ensure your flour blend includes xanthan gum; if not, add 1 teaspoon to the mix. Dip your spoon in water to shape the sticky dough without it clinging to your tools. Always toast your slices to bring back that ‘just-baked’ texture.
This recipe is a game-changer for the Gluten-Free Bread world. It is special because it uses a “no-knead” method. This means you just mix the ingredients in a bowl and let time do the work for you. The result is a loaf with a crispy outside and a soft, airy inside.
- Time Requirement: 10 minutes of prep, 2 hours for rising, and 45 minutes for baking.
- Difficulty Level: Easy. This is perfect for your very first loaf.
- Safety: This recipe is 100% gluten-free and safe for those with celiac disease or gluten sensitivity.
Essential Gluten-Free Ingredients
To get the best results, use ingredients that are certified gluten-free. This ensures there is no hidden wheat in your food.
- 3 cups Gluten-Free All-Purpose Flour Blend: Look for a blend that includes xanthan gum. This acts like the “glue” that gluten usually provides.
- 1 1/2 cups Warm Water: The water should feel like warm bath water, around 110 degrees Fahrenheit. If it is too hot, it will kill the yeast.
- 2 1/4 teaspoons Active Dry Yeast: This is usually one standard paper packet.
- 1 teaspoon Salt: This brings out the flavor of the bread.
- 1 tablespoon Sugar or Honey: This helps the yeast wake up and grow.
- 1 tablespoon Olive Oil: This makes the inside of the bread soft.
Optional Variations:
- Dairy-Free: This recipe is naturally dairy-free if you use water and oil.
- Vegan: Use sugar or maple syrup instead of honey.
- Herb Bread: Add 1 tablespoon of dried rosemary or Italian seasoning to the dry mix.
Step-by-Step Instructions
Follow these steps to create your loaf. Remember, gluten-free dough looks more like a thick cake batter than traditional bread dough. Do not worry if it seems sticky.
- Prepare the Yeast: In a small bowl, mix the 1 1/2 cups of warm water with the 1 tablespoon of sugar. Sprinkle the 2 1/4 teaspoons of yeast on top. Let it sit for about 5 to 10 minutes until it looks foamy.
- Mix the Dry Ingredients: In a large glass bowl, whisk together the 3 cups of gluten-free flour and 1 teaspoon of salt.
- Combine: Pour the yeast mixture and 1 tablespoon of olive oil into the flour. Stir with a large spoon until all the flour is wet. You do not need to use your hands.
- First Rise: Cover the bowl with a clean kitchen towel or plastic wrap. Set it in a warm, draft-free spot. Let it rise for about 2 hours. The dough should get bigger and look bubbly.
- Preheat: Put your glass loaf pan or a Dutch oven into the oven. Turn the oven to 425 degrees Fahrenheit. Let the pan get hot while the oven heats up.
- Transfer: Carefully take the hot pan out of the oven. Line it with a piece of parchment paper. Use a spatula to scoop the dough into the pan. Smooth the top with a wet spoon.
- Bake: Put the pan back in the oven. Bake for 40 to 45 minutes. The top should be a deep golden brown and sound hollow when you tap it.
- Cool: This is the hardest part. Let the bread cool completely on a wire rack before cutting it. If you cut it while it is hot, the inside might feel gummy.
Tips for Success:
- Avoid Cross-Contamination: Use clean bowls and spoons that have not touched wheat flour.
- Wet Your Tools: Gluten-free dough is very sticky. Dipping your spoon in water will help you shape the top of the loaf without it sticking to everything.
Assembly or Serving Suggestions
Once your bread is cool, you can slice it and enjoy it in many ways. For a beautiful look, serve the loaf on a wooden cutting board.
- Breakfast: Toast a slice and top it with mashed avocado and a sprinkle of salt.
- Dinner: Serve warm slices alongside a fresh gluten-free salad or a bowl of hot soup.
- Simple Snack: Spread a thick layer of salted butter or a dairy-free dip over a toasted piece.
Storage and Make-Ahead Tips
Gluten-free bread does not have preservatives, so it can dry out faster than store-bought bread.
- Room Temperature: Keep the bread in a sealed bag or container for up to 2 days.
- Freezing: This bread freezes very well. Slice the loaf first, then place parchment paper between the slices. Put them in a freezer bag. This way, you can take out just one slice at a time.
- Reheating: Always toast your gluten-free bread. It brings back the “just-baked” texture. If it is frozen, you can put it straight into the toaster.
Recipe Variations
You can use this base recipe to make different types of treats.
- Cheesy Bread: Stir in 1/2 cup of shredded cheddar cheese before the dough rises.
- Everything Bagel Bread: Sprinkle everything bagel seasoning on top of the dough right before you put it in the oven.
- Cinnamon Raisin: Add 1/2 cup of raisins and 1 tablespoon of cinnamon to the flour.
- Garlic Bread: Brush the top of the finished loaf with melted butter and minced garlic, then toast it for a few minutes.
Conclusion
Baking your own bread is a wonderful way to take control of your diet. You deserve to have delicious, crunchy bread that makes you feel good. Do not be afraid to try this recipe, even if you have never baked before. It is designed to be simple and successful. Once you smell that fresh bread in your kitchen, you will never want to go back to the frozen aisle. Please share your results or your favorite toppings in the comments.
FAQs Section
Can I use oat flour instead of a gluten-free flour blend? It is best to use a pre-made gluten-free all-purpose flour blend for this recipe. Oat flour alone does not have the structure to hold up a tall loaf of bread. If you use a blend, make sure the oats are certified gluten-free to avoid contamination.
How do I keep this bread from crumbling? The xanthan gum in your flour blend is what keeps the bread together. If your flour does not have it, you should add 1 teaspoon of xanthan gum to the mix. Also, letting the bread cool completely before slicing is the best way to prevent crumbling.
Is this bread healthy? Homemade bread is often healthier because you know exactly what is inside. There are no chemicals or strange preservatives. This recipe provides energy and is easy on the stomach for people who cannot process gluten.
How do I know if my yeast is working? When you mix the yeast with warm water and sugar, it should start to bubble and smell like beer within 10 minutes. If the water stays flat and clear, your yeast might be old. You should start over with a fresh packet of yeast for the best rise.