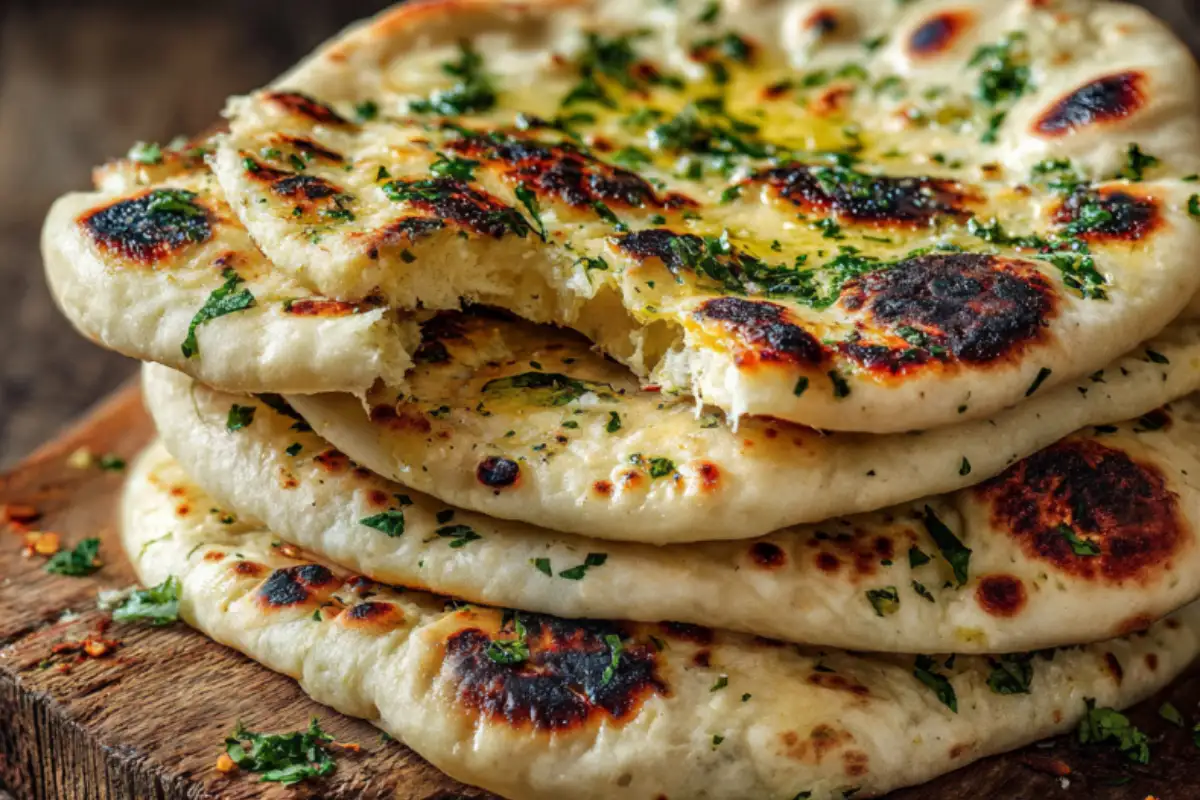
Have you ever sat at an Indian restaurant, smelling the rich aroma of garlic, ghee, and fresh bread, wishing you could tear off a piece of warm naan without worrying about gluten? Giving up traditional bread is often one of the hardest parts of transitioning to a gluten-free lifestyle. Many store-bought gluten-free breads are stiff, dry, or crumble the moment you try to bend them. You do not have to settle for subpar alternatives or miss out on your favorite comfort foods. This recipe delivers the soft, pillowy, blistered naan of your dreams, completely free of gluten.
Recipe Overview
This recipe recreates the classic Indian flatbread using smart gluten-free techniques. Traditional naan relies on wheat gluten for its signature chew and elasticity. This version achieves that exact stretch and softness by using a precise blend of gluten-free flours combined with yogurt and psyllium husk.
- Difficulty Level: Medium. While the steps are simple, handling gluten-free dough requires a gentle touch.
- Time Requirement: 45 minutes total (20 minutes preparation, 15 minutes resting, 10 minutes cooking).
- Dietary Safety: This recipe is 100% gluten-free and safe for individuals with celiac disease or non-celiac gluten sensitivity.
Essential Gluten-Free Ingredients
Using the right ingredients is the secret to successful gluten-free baking. For the best results, use a digital kitchen scale to measure the flours precisely.
The Dough
- Gluten-Free Flour Blend: 2 cups (280 grams) of a high-quality 1:1 baking flour containing xanthan gum. Look for brands certified gluten-free to ensure safety from cross-contamination.
- Whole Psyllium Husk: 1 tablespoon. This ingredient mimics gluten by absorbing moisture and giving the dough its bendable, elastic texture. Do not use powder, as it can turn the dough purple and gummy.
- Baking Powder: 1 teaspoon. Provides the lift needed to create airy bubbles in the bread.
- Sugar: 1 teaspoon. Feeds the yeast and helps with surface browning.
- Instant Yeast: 1 packet (7 grams). Gives the naan its traditional yeast flavor and light texture.
- Warm Water: 3/4 cup (180 milliliters), heated to 110°F. Water that is too hot will kill the yeast.
- Plain Greek Yogurt: 1/2 cup (120 grams). Adds moisture, richness, and the signature tangy flavor of authentic naan. Ensure it is at room temperature.
- Salt: 1 teaspoon. Enhances the overall flavor of the dough.
The Garlic Topping
- Melted Butter or Ghee: 4 tablespoons.
- Garlic: 4 cloves, finely minced.
- Fresh Cilantro: 2 tablespoons, finely chopped.
Dietary Substitutions
- Dairy-Free / Vegan Option: Replace the Greek yogurt with an equal amount of unsweetened plain coconut yogurt or almond milk yogurt. Substitute the melted butter with vegan butter or olive oil.
Step-by-Step Instructions

Gluten-free dough behaves differently than wheat dough. It will feel wetter and more like a thick paste initially, but it will firm up as it rests.
Step 1: Activate the Yeast
In a small bowl, combine the warm water, sugar, and instant yeast. Stir gently and let it sit for 5 to 10 minutes until the mixture becomes frothy and bubbles form on top.
Step 2: Mix the Dry Ingredients
In a large mixing bowl, whisk together the gluten-free flour blend, psyllium husk, baking powder, and salt. Ensure there are no lumps in the mixture.
Step 3: Combine Wet and Dry
Add the room-temperature Greek yogurt and the activated yeast mixture to the bowl of dry ingredients. Stir with a wooden spoon or a silicone spatula until a sticky dough forms.
Step 4: Knead and Rest the Dough
Turn the dough out onto a surface lightly dusted with gluten-free flour. Knead gently for 2 to 3 minutes until the dough becomes smooth. If it feels too sticky to handle, add an extra tablespoon of flour. Divide the dough into 4 equal portions and shape them into smooth balls. Place the dough balls on a platter, cover them with a clean, damp kitchen towel, and let them rest for 15 minutes. This resting time allows the psyllium husk and flour to absorb the liquids fully.
Step 5: Roll Out the Naan
Place a sheet of parchment paper on your counter and dust it lightly with gluten-free flour. Place one dough ball on the paper. Use a rolling pin to roll the dough into an oval shape about 1/4-inch thick. Gluten-free dough can tear easily, so using parchment paper makes it easy to lift and transfer the bread to the pan.
Step 6: Cook the Naan
Heat a heavy cast-iron skillet or non-stick pan over medium-high heat until it is hot. Do not add oil to the pan. Carefully lift the naan using the parchment paper, flip it face-down into the hot skillet, and peel away the paper. Cook for 2 to 3 minutes. You will see bubbles form on the surface, and the bottom will develop dark brown blisters. Flip the naan and cook the other side for an additional 1 to 2 minutes.
Step 7: Apply the Garlic Topping
While the naan cooks, mix the melted butter and minced garlic in a small bowl. As soon as each naan comes out of the skillet, brush it generously with the garlic butter and sprinkle with fresh chopped cilantro. Stack the finished naan on a plate covered with a clean towel to keep them soft and warm.
Serving Suggestions
This warm flatbread pairs beautifully with a variety of meals.
- Classic Pairing: Serve alongside a rich chicken tikka masala, butter chicken, or a hearty lentil dahl. Use the bread to scoop up the flavorful sauces.
- Gluten-Free Dips: Use it as an appetizer paired with homemade hummus, cucumber tzatziki, or a dairy-free garlic dip.
- Naan Pizza: Use a leftover piece of naan as a quick pizza crust. Top it with marinara sauce, cheese, and your favorite toppings, then bake at 400°F for 8 minutes until crisp.
Storage & Make-Ahead Tips
Gluten-free breads tend to dry out faster than traditional baked goods, but proper storage keeps them delicious.
- Room Temperature Storage: Store leftover cooled naan in an airtight container or a zip-top bag at room temperature for up to 2 days.
- Freezing Instructions: To freeze, place a piece of parchment paper between each naan to prevent sticking. Place the stack inside a freezer-safe bag and freeze for up to 3 months. Thaw at room temperature before reheating.
- Reheating for Perfect Texture: Avoid using the microwave, as it can make gluten-free bread rubbery. Instead, reheat the naan in a dry skillet over medium heat for 1 to 2 minutes on each side. Sprinkle a few drops of water into the pan and cover it with a lid to create steam, which restores the original fluffy texture.
Recipe Variations
- Cheesy Naan: Sprinkle 1/4 cup of shredded mozzarella or dairy-free cheese onto one half of the rolled-out dough. Fold the other half over to seal the cheese inside, press the edges firmly, and roll slightly before cooking.
- Nigella Seed Naan: Press 1/2 teaspoon of nigella seeds or black sesame seeds into the dough surface right before rolling it out for an earthy flavor note.
- Herb and Olive Oil Naan: Skip the garlic and brush the warm bread with high-quality extra virgin olive oil, dried oregano, and rosemary.
Conclusion
Living gluten-free does not mean giving up the textures and flavors you love. With the right ingredients and a little patience, you can create restaurant-quality flatbread right in your kitchen. This bread is soft, pliable, and packed with savory garlic flavor. Gather your ingredients, dust off your skillet, and enjoy the process of making fresh bread. Please share your cooking results, adjustments, or favorite pairings in the comments section below.
FAQs Section
Can I use oat flour or almond flour instead of a 1:1 gluten-free flour blend?
No, oat flour and almond flour lack the structure needed for this recipe. Almond flour contains too much fat and no starches, which will cause the dough to crumble. Oat flour absorbs too much moisture. A 1:1 gluten-free baking blend contains balanced starches like potato starch and tapioca flour, which mimic wheat flour closely.
How do I keep my gluten-free naan from crumbling?
The secret to preventing crumbling is the whole psyllium husk. It acts as a binder, replacing the missing gluten structure. Ensuring your dough rests for 15 minutes before rolling also allows the flours to hydrate completely, creating a stronger, more cohesive dough.
Is this recipe quick to prepare?
Yes, this recipe is highly versatile and quick. Unlike traditional breads that require hours of rising time, this dough only needs a brief 15-minute rest. You can prepare, cook, and serve a fresh batch of bread in less than an hour.
What are the health benefits of making this homemade?
Making your bread at home allows you to avoid the artificial preservatives, excess sodium, and stabilizers found in commercial gluten-free breads. The addition of Greek yogurt provides a boost of protein and calcium to your meal.